Jekyll2024-04-01T21:01:18+02:00https://mehmandarov.com/feed.xmlRustam MehmandarovA blog about technology and related stuffMultiplying The Developer Joy: Multiple Quarkus Containers + Simultaneous Remote Development Sessions2024-03-30T10:50:00+01:002024-03-30T10:50:00+01:00https://mehmandarov.com/remote-dev-mode-quarkusRunning several simultaneous Quarkus app containers on your machine with the Quarkus’ remote development mode activated presents some challenges. Let’s have a look at how we can fix this.
The built-in development mode for Quarkus is a great functionality that lets you update the application code, resources, and configurations. Setting it up is a great way to develop your applications locally, as you can immediately see the changes reflected in your application.
Furthermore, we have a remote development mode, which lets you make changes to local files immediately available in a containerized environment. Remote development mode works excellently if the container runs in a local Docker or remote containerized environment.
However, running several simultaneous containers with the remote development mode on, mapped to the same domain, may result in warnings and erratic behavior from the client side.
Setup
Imagine a setup where you are running a set of containers, for example, using docker-compose and mapping them all to my.cluster.host.com (or even localhost)through several ports:
Microservice Setup Example
First, you will need to update quarkus.live-reload.url in the properties for all the apps (see docs on where and how to do this). Update the settings to the correct domain and port (in our case, it is 8080, 8081, or 8082):
quarkus.live-reload.url=http://localhost:8081
Next, try starting your containers with the remote development mode enabled and connect to the application from a terminal or an IDE. For the second and the consecutive applications, the attempts to establish a connection you will see the following message in the logs:
$> ./mvnw quarkus:remote-dev -Dquarkus.profile=dev

< ... >

[WARNING] Changed debug port to 57409 because of a port conflict
Listening for transport dt_socket at address: 57409

< ... >
Note: Fallback ports will be random and may vary from the one above.
This setup will break the remote reloading from the terminal on the client side (i.e., your IDE). Two or more of your client applications now see that the default port 50005 for a remote debug is in use and start with a new, random port.
The simple fix is to update the debug ports for all other applications to something other than 5005, such as 6006 and 6007. Custom debug ports can be set in the pom.xml files, under quarkus-maven-plugin, for each of the applications that require this update:
<build><plugins><plugin><groupId>io.quarkus.platform</groupId><artifactId>quarkus-maven-plugin</artifactId><version>${quarkus.platform.version}</version><!-- ADD THE CONFIGURATION MENTIONED BELOW THIS LINE --><configuration><debug>6006</debug></configuration>
...
You can choose whether to update the debug ports for all applications in the cluster or for all applications except one, which will get the default port.
Now, you will need to rebuild your apps and re-initiate the remote development mode for each container. And, voilà, everything works!
One last note: Please ensure you do not use the remote development functionality in the production environment.
Conclusion
A tiny config update brings back the development joy of using remote development mode for more than one container simultaneously.
Happy coding!
]]>rustam.mehmandarovCloud Security Principles: Part 22023-10-17T15:50:00+02:002023-10-17T15:50:00+02:00https://mehmandarov.com/cloud-security-principles-2This is the second part of the series on the Cloud Security Principles. This post will look at some key principles for securing your applications. Similarly to the first post, some prior knowledge of various IT architecture and security concepts may be expected. This post was inspired by a talk I have recently done with Neha Sardana at JAX New York.
In the first part, we have summed up all the essential elements to consider when working with Cloud and securing cloud-native applications/platforms. In this post, we would like to give you some concrete principles and tips for creating more secure applications.
Principles
Multi-Layered Defense
Keywords: general
First of all, a more generic but important principle: It would be best to look at security as a whole – integrating various security layers on multiple levels in any system. It should include cyber-security plans for:
Devices
Applications
Networks
Infrastructure
People
Think of this principle as all the layers of clothing you wear to protect yourself from cold and bad weather. If one of the layers is compromised, there is always another to keep you warm and dry.
Identity and Access Management (IAM) Misconfiguration
Keywords: network, permissions
You need to control access and permissions meticulously and over time.
Things to consider:
Implementing role-based access control (RBAC)
Principle of least privilege
Routines for updating and removing permissions when they are no longer needed.
Explore possibilities for using time-based conditions for IAM policies.
API Security
Keywords: endpoints, permissions
APIs act as the gateways to your application and data. Securing access to and securing them from known vulnerabilities is paramount to prevent unauthorized access and data breaches.
Utilize authentication, authorization, and API gateways to control access and protect sensitive information. Don’t forget to monitor the software or libraries that make APIs available (e.g., runtimes, middleware)
Data Encryption
Keywords: data
Safeguarding data at rest, in transit, and during processing is critical for your applications.
Utilize encryption, tokenization, and data masking techniques to ensure data protection. Removing unnecessary sensitive information can simplify some of these tasks.
If a platform or a Cloud provider provides the encryption, consider if you would like to use the standard keys for encryption or “bring your own” and manage them yourself or through a third party.
Beware: Don’t write your own crypto! Ever.
Zero Trust
Keywords: network, permissions
The Zero Trust security model assumes that no one is inherently trustworthy, even those within your network.
This is opposed to more traditional approaches where perimeter security was prioritized over security inside the network.
Adopting this approach, every request, user, and device is thoroughly verified before gaining access.
Again: Implement the principle of least privilege, where users are only granted the minimum level of access required to perform their tasks.
Governance: Know where all the building blocks (artifacts) of your software are coming from.
Automate security checks within your CI/CD pipeline to catch vulnerabilities early and often.
Use static code analysis with tools like SonarQube to scan your code for potential security flaws and integrate those checks into your CI/CD pipeline to ensure continuous security monitoring.
Use tools to monitor not only the code you develop yourself but also all the third-party libraries you utilize in your code.
With DevSecOps, automated security security is becoming integral to the development process. Adopt it if you haven’t done so already.
Secure Containerization
Keywords: software, environment
Containerization and orchestration technologies, like Docker and Kubernetes, offer exceptional flexibility but also introduce security concerns.
Securing containers and managing their lifecycle is vital to ensure a safe cloud environment.
For example, use container scanning tools to identify vulnerabilities within container images before deploying them.
Additionally, enforce strict security policies and segregate workloads using Kubernetes namespaces.
Continuous Monitoring and Incident Response
Keywords: software, environment
The cloud landscape is constantly changing, and threats evolve rapidly. This means that we need to monitor not only for known threats but also for anomalies.
Continuous monitoring and proactive incident response are essential to detect anomalies and respond swiftly to security incidents.
For example, use cloud-native monitoring tools your Cloud or platform provider provides.
Have good logging, but remember that more is not always better – log relevant information.
Human Factors (including Social Engineering, Misconfigurations, and Human Errors)
Creating secure applications also implies providing security training for the system users.
Social engineering and human factor has proven to be essential to creating secure applications.
Consider running security awareness campaigns and employee training from user and developer perspectives.
Automate routine and mundane tasks – humans often don’t enjoy carrying out tasks like this and are prone to errors; computers, on the other hand, excel at tasks like this!
Conclusion
You have probably heard that nothing is stronger than its weakest link. Therefore, it is important to look at various sides of the security. Especially in the Cloud, one size does not fit all when it comes to security. Cloud platforms, software, and threats constantly evolve and add to the complexity of creating secure applications.
Here, we have seen some of the principles to consider regarding the security of the platforms and application development for the Cloud and cloud-native applications in general.
Finally, note that this is not an exhaustive list but is instead meant to serve as a stepping stone to more secure application development.
]]>rustam.mehmandarovCloud Security Principles2023-10-12T09:50:00+02:002023-10-12T09:50:00+02:00https://mehmandarov.com/cloud-security-principlesThis post was inspired by a talk I have recently done with Neha Sardana at JAX New York and is meant to serve as a stepping stone to categorize and catalog the things you need to consider working with the Cloud and Cloud-native applications. Some prior knowledge of various concepts within IT architecture and security may be expected for this post.
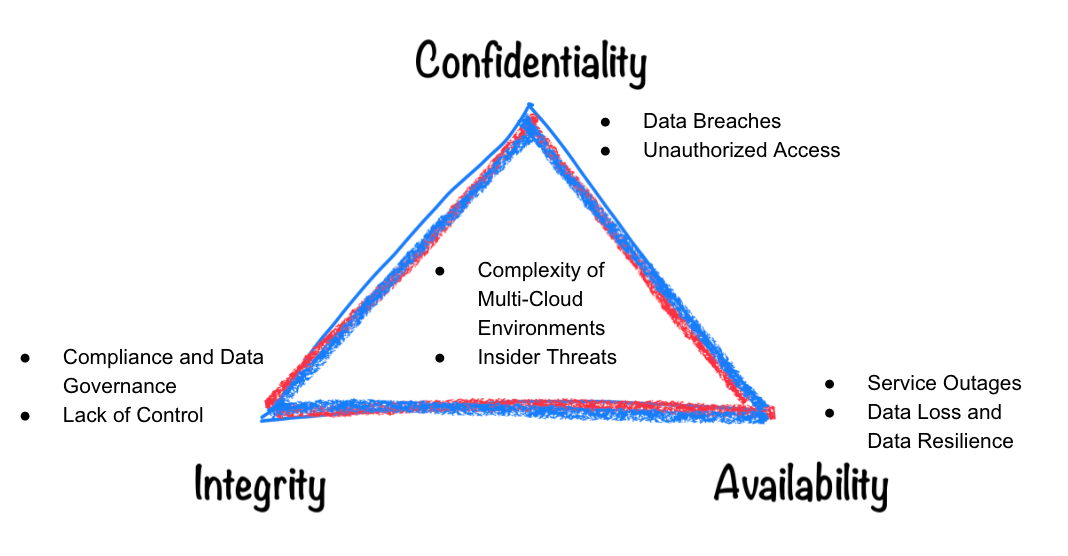
Whether you are running on the Cloud or not it is all about the CIA triad model – Confidentiality, Integrity, and Availability.
When thinking about Cloud Security Architecture we need to be able to think about the whole stack. Of course, we don’t need to think about all the moving parts alone – it is a shared responsibility between the Cloud service provider and you, the user of the platform.
Key Elements of a Cloud Security Architecture
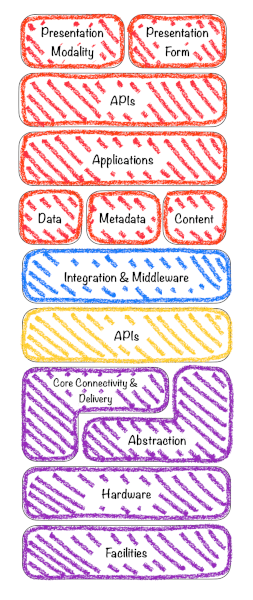
Let’s first start by defining the key elements of a Cloud Security Architecture, divided across the layers of the stack, based on the Cloud Security Alliance (CSA) stack model.
Fig.1: Cloud Security Alliance (CSA) stack model
Now, we can also mention some of the main challenges related to security, divided into separate groups, and try to map them to the CIA triad model that we have mentioned earlier.
Network and Storage
Data Encryption
Network Security
Application layer
Application Security
Logging and Monitoring
Identity and Access Management (IAM)
Observability, and traceability
Incident Response and Recovery
Vendor and Third-Party Risk Management
DevOps
Automation and Orchestration
Resilience and High Availability
General
Compliance and Governance
User Training and Awareness
Cloud Provider Security Features
Fig.2: Challenges of Cloud Security
Responsibilities
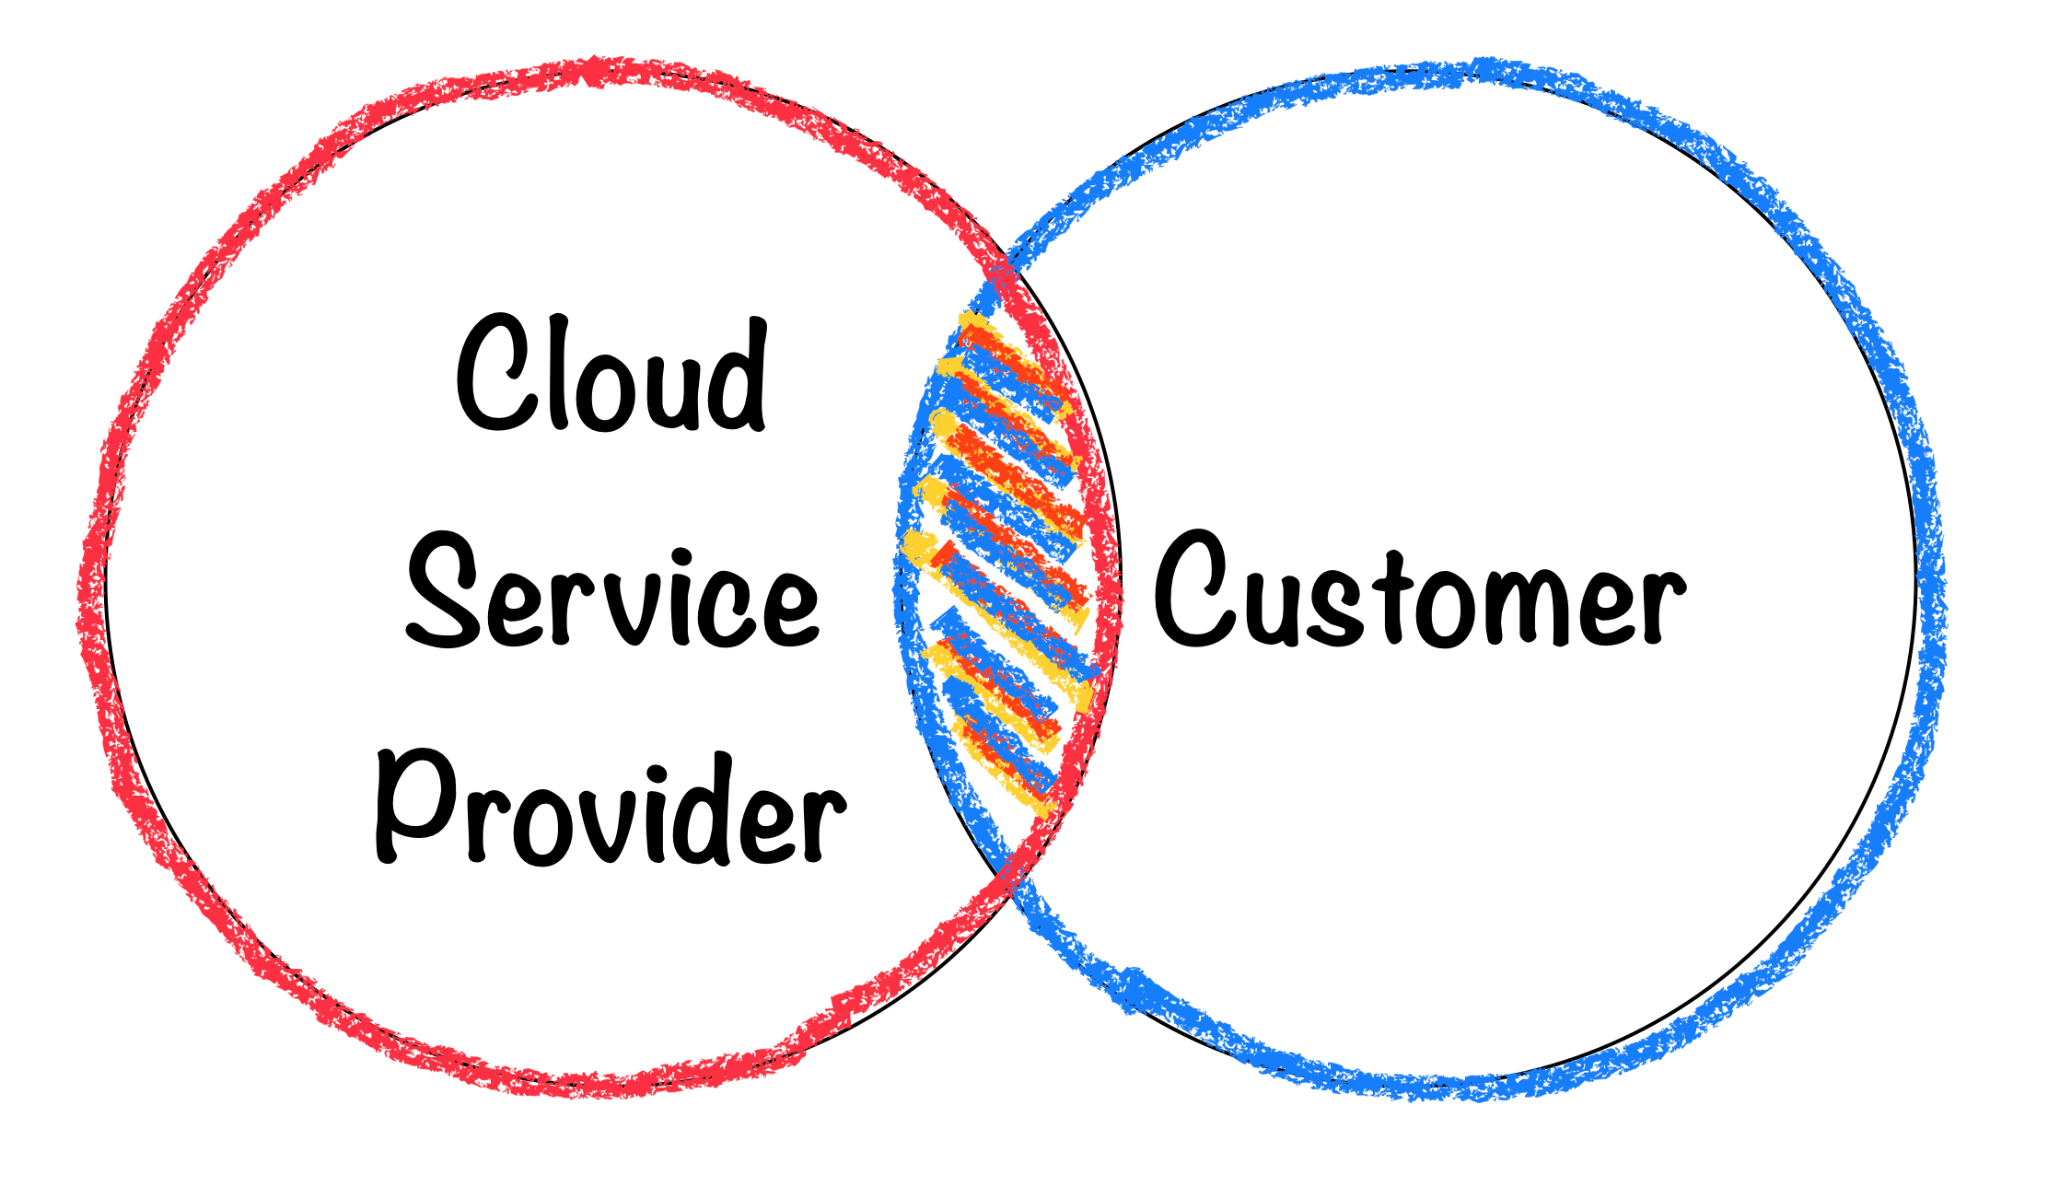
Shared Responsibility + Intersection of Responsibilities
Addressing all these challenges is a shared responsibility between the Cloud service provider and the customer and the division will vary depending on the type of the solution and whether you are using IaaS, PaaS, or SaaS.
Typically, Cloud service providers will take care of the lower parts of the stack, like physical, infrastructure, and platform security, while customers will be responsible for creating secure applications, securing their data, creating proper Identity and Access Management (IAM), and configuration management.
An effective overlap and a clear understanding of the responsibilities ensure comprehensive security coverage across all layers.
Fig.3: Shared security responsibility between the Cloud Service providers and the Customers
Constantly Evolving Landscape
Evolving Landscape == Constant Change
One of the differentiating factors from regular application development is the constant change and evolution of the platform and tooling on one side, and the constantly evolving types of attacks and possibly larger attack surfaces on the other side.
These factors will lead to changes in the model and the responsibility division. The same might be influenced by the new services being introduced both from the side of the Cloud service provider and the customer (app developer).
Therefore, regular communication between the parties involved and staying updated on their security practices is essential to ensure secure Cloud applications.
Types of the Cloud Security Architecture
The Cloud Security Architecture is twofold – you will need to choose a platform for running your application and think about the security of the application you will be deploying on that platform.
Platform Security Architecture
Let’s start with defining the types of platforms and list some of the key elements to consider when choosing a platform type.
Public Cloud Security Architecture
Designed for cloud services provided by third-party vendors (e.g., AWS, Azure, Google Cloud).
Focuses on securing data and applications hosted on shared infrastructure.
Utilizes the security features provided by the cloud service provider (CSP) while also implementing * additional security measures.
Emphasizes network segmentation, encryption, IAM, and monitoring.
Private Cloud Security Architecture
Created for cloud environments dedicated to a single organization.
Offers more control over security settings and configurations.
Often used by organizations with strict compliance requirements or sensitive data.
Implements strong access controls, encryption, and strict network isolation.
Hybrid Cloud Security Architecture
Combines public and private clouds to take advantage of the benefits of both deployment models
Security architecture addresses integration challenges and ensures consistency across environments
Emphasizes secure communication between on-premises and cloud components
Requires seamless identity and access management across both environments
Multi-Cloud Security Architecture
Involves using services from multiple cloud providers simultaneously
Ensures compatibility and security across diverse cloud platforms
Requires careful management of authentication, authorization, data protection, and compliance measures
Aims to prevent vendor lock-in and distribute risk
Application Security Architecture
Here are some things you will need to think about when developing modern applications for the Cloud and the cloud-native world.
1. Secure Your Code
Software Supply Chain Security: Securing and monitoring your artifacts and third-party libraries.
Making sure the code you have written is secure: OWASP Top 10, static code analysis, coding best practices.
2. Your Container (and Serverless) Security Architecture
Specifically addresses security for containerized applications (e.g., Containers, Kubernetes) and serverless computing (e.g., AWS Lambda, Azure Functions, Cloud Functions, or Cloud Run on Google Cloud)
Focus on securing microservices, communication between them, their orchestrators, and function-as-a-service (FaaS) platforms
Involves isolating containers, securing images, and managing runtime security
3. Add DevSecOps Architecture Practices
Integrate security practices into the DevOps process: DevSecOps
Ensure security is considered at every stage of application development and deployment
Involves automated security testing, vulnerability scanning, and security policy enforcement
4. Cross-application and Cross-container communication: Zero Trust Security Architecture
Assume no trust by default and require strict authentication and authorization for all users and devices
Focus on identity verification, principle of least privilege, and continuous monitoring
Suitable for cloud environments where traditional perimeter defenses are less effective
Address security concerns at the edge of the network, closer to where data is generated and consumed
In case of having local edge hardware devices consider also physical security of those devices
Involves considerations like local processing, secure communication, and protection against threats targeting edge devices
6. Compliance-Centric Security Architecture
Tailored to meet specific regulatory compliance requirements (e.g., GDPR, HIPAA, PCI DSS)
Focus on implementing controls and safeguards to adhere to relevant standards
Conclusion
We have seen the key elements of the cloud security architecture and the building blocks of the whole stack. Furthermore, we have looked at the various types and elements to consider when it comes to the security of the platforms and application development. This is a stepping stone to categorize and group some of the main things you will need to consider when working with the Cloud and cloud-native applications.
** Illustrations in this post: Rustam Mehmandarov.
]]>rustam.mehmandarovIt Is Alive! Again!2023-01-15T18:50:00+01:002023-01-15T18:50:00+01:00https://mehmandarov.com/it-is-alive-againGetting the site updated and rebooting blogging. It’s back!
Welcome back!
Finally, after a long hibernation, this site is returning to life. Watch out for new posts coming to servers near you!
I look forward to seeing how the site will develop and future posts. Stay tuned!
]]>rustam.mehmandarovBuilding a Basic Apache Beam Pipeline in 4 Steps with Java2020-02-21T07:35:00+01:002020-02-21T07:35:00+01:00https://mehmandarov.com/beam-pipeline-in-four-stepsGetting started with building data pipelines using Apache Beam.
In this post, I would like to show you how you can get started with Apache Beam and build the first, simple data pipeline in 4 steps.
Step 1: Define Pipeline Options
Let’s start with creating a helper object to configure our pipelines. This is not an absolute necessity, however defining the pipeline options might save you some time later, especially if your pipeline is dependent on a few arguments, that might have pre-defined, default values that you don’t want to provide at every run.
publicinterfaceOsloCityBikeOptionsextendsPipelineOptions{/**
* By default, the code reads from a public dataset containing a subset of
* bike station metadata for city bikes. Set this option to choose a different input file or glob
* (i.e. partial names with *, like "*-stations.txt").
*/@Description("Path of the file with the availability data")@Default.String("src/main/resources/bikedata-stations-example.txt")StringgetStationMetadataInputFile();voidsetStationMetadataInputFile(Stringvalue);// some other options here...}
Step 2: Create the Pipeline
Now that you have created the pipeline options object, you will need to create the pipeline object itself and provide the options to it:
(Check out the documentation for the PipelineOptionsFactory class for the description of the methods used above.)
Step 3: Apply Transformations
After defining the pipeline and providing the options class, we can start by applying the transformations using .apply(...). Those can be chained after each other by applying yet another .apply(...), for instance:
Note that a PCollection<T> is an immutable collection of values of type T and that you can provide names for the transformations as the first string argument in the apply(), like in the first two and the last apply methods.
Here we can also specify custom transformations that can be done in parallel. In Beam, they are being referred to as ParDo methods. They are similar to the Mapper or Reducer class of a MapReduce-style algorithm. In this post, we will not be focusing on the contents of such pipeline (i.e. what it is doing), but a simple example of a ParDo can be looking like the second apply in the code above (look for the link in the conclusion for the entire running example).
After defining the pipeline, its options, and how they are connected, we can finally run the pipeline. The great thing about running the pipelines in Apache Beam is that it is very easy to switch between various runners. Beam provides a portable API layer for building sophisticated pipelines that may be executed across various execution engines or runners. In our example, we can switch from running the pipeline locally (with direct-runner), to running the same pipeline in the Cloud as a managed service (with dataflow-runner) by simply adjusting the values we provide when running the code.
Local runner
Here is an example of running the pipeline with direct-runner:
And here is the example of running the same pipeline in the Cloud as a managed service, using Google Cloud Dataflow. Note that most of the parameters provided are still the same, with a few additional parameters needed for this specific runner.
In case you would like to be using various runners or interested in switching between them, it might be a good idea to check the capability matrix in the documentation, as the core concepts of Beam Model can sometimes be implemented to varying degrees in each of the Beam runners.
Conclusion
We have now seen the basic steps needed to create a simple data-parallel processing pipeline and how that can be run and deployed both in the local and managed Cloud environments. We are were also able to run the same pipeline with just a few adjustments to the command line parameters and, in our case, without any changes to the pipeline code.
]]>rustam.mehmandarovGetting a Graph Representation of a Pipeline in Apache Beam2019-11-27T08:15:00+01:002019-11-27T08:15:00+01:00https://mehmandarov.com/apache-beam-pipeline-graphGetting a pipeline representation in Apache Beam explained step-by-step.
Constructing advanced pipelines, or trying to wrap your head around the existing pipelines, in Apache Beam can sometimes be challenging. We have seen some nice visual representations of the pipelines in the managed Cloud versions of this software, but figuring out how to get a graph representation of the pipeline required a little bit of research. Here is how it is done in a few steps using Beam’s Java SDK.
TL;DR: Getting Graph Representation
If you just want to see a few lines that let you generate the DOT representation of the graph, here it is:
importorg.apache.beam.runners.core.construction.renderer.PipelineDotRenderer;Pipelinep=Pipeline.create(options);// do stuff with your pipelineStringdotString=PipelineDotRenderer.toDotString(p);
Now, if you want a slightly more comprehensive example, keep on reading.
First, we need to add a dependency to the Maven file under <dependencies> section:
<dependencies><!-- ... all the other dependencies you may have --><dependency><groupId>org.apache.beam</groupId><artifactId>beam-runners-core-construction-java</artifactId><version>${beam.version}</version></dependency></dependencies>
The Code
Now, we will need to add a few imports (assuming you already added the Maven dependency mentioned earlier):
To get the DOT representation of the pipeline graph we will be passing the pipeline object to the PipelineDotRenderer class, and in this example, we are only logging the output to the console (hence the log4j imports).
// Create the Pipeline object with the options we defined abovePipelinep=Pipeline.create(options);// ... do stuff with your pipeline ...// Add this piece of code just before running the pipeline:finalLoggerlog=LoggerFactory.getLogger(MinimalWordCount.class);StringdotString=PipelineDotRenderer.toDotString(p);log.info("MY GRAPH REPR: "+dotString);p.run().waitUntilFinish();
That’s it. To see the code in action, run it from the command line:
This code will produce a DOT representation of the pipeline and log it to the console.
A Complete Example
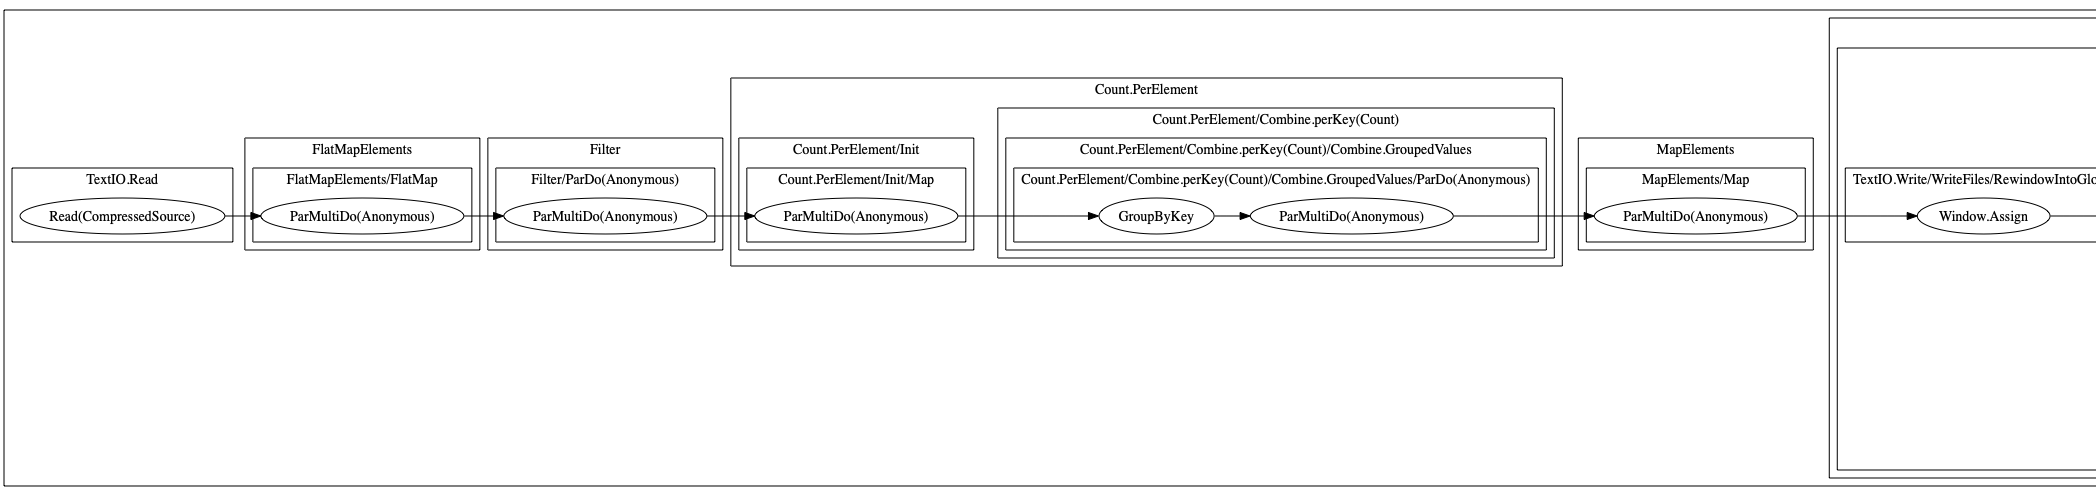
A fully working example can be found in my repository, based on MinimalWordCount
code. There, in addition to logging to the console, we will be storing the DOT representation to a file.
In the next section, we will have a brief look at what can be done with the DOT representations.
What Now?
Now that we have a DOT representation of the pipeline graph, we can use it to get a better understanding of the pipeline. For instance, you can generate an SVG or a PNG image from the data. Note that the generated graph might be a bit verbose, but gives a good overview of the pipeline graph.
Here, I have also included examples of the DOT graph and the PNG file generated for that particular pipeline.
Assuming that you have Graphviz tools installed, you can convert a DOT file to a PNG image using this command:
In addition to Grapgviz (Wikipedia link), there are also online services for converting DOT graphs to graphical representations, like this one.
A part of a graphical representation for the pipeline in the MinimalWordCount example. ]]>rustam.mehmandarovMicroProfile – Part 1: Defining End-Points2019-07-29T07:25:00+02:002019-07-29T07:25:00+02:00https://mehmandarov.com/microprofile-101-part1Part 1: End-points in MicroProfile. This is a part of a series of posts to help you get started with microservices in MicroProfile and showing off some of the features it brings to the table.
In my previous two posts, I have been describing parts of a system for “checking-in” to a location using QR codes in Java. We started with generating QR codes, followed by generating PDF files.
Now, I would like to focus on building microservices around that functionality. We will be creating a few HTTP end-points built with MicroProfile. I will be using the next few posts as an opportunity to show off some of the features that you will be getting out of the box or with minimal effort using MicroProfile.
Getting started
(Assuming that you have Git, Java 9+, and Maven installed.)
Since we will continue using the QR code generator project to showcase various features of MicroProfile, it might be a good idea to familiarize yourself with the code. You might want to start with taking a look at my previous two posts that explain the code for generating QR codes, and generating PDF files in detail.
Now you can clone the project and examine the Maven dependencies in the pom.xml file, as well as any other MicroProfile related dependencies.
After cloning and opening the project in your favorite IDE, build it (again, assuming that you have Java and Maven installed) with the following command in a terminal:
$ mvn clean package
When the project is done building and you have got a Build Success from Maven, you can run the project to make sure everything runs fine:
One of the most obvious features any microservice needs is an end-point to receive requests and respond with some kind of data back. Let’s have a closer look into how this is done in MicroProfile. First of all, we will need to define the application path that serves as the base URI for all resource URIs (think of it as a “root” URL) and make sure that the class where it is defined extends javax.ws.rs.core.Application, like in ApplicationEntryPoint class here:
packagecom.mehmandarov.qrcreator;importjavax.ws.rs.ApplicationPath;importjavax.ws.rs.core.Application;/**
* Sets the application path that serves as the base URI for
* all resource URIs provided by @Path annotation.
*/@ApplicationPath("/api")publicclassApplicationEntryPointextendsApplication{}
Now, let’s define some endpoints. We will start with a most regular kind – a JSON end-point. This is probably the most common end-point you will encounter.
We will start with creating one that would respond to requests sent to /api/somestring/json. Note that as you can see from the code below, @Path defines somestring in the URL as an id that is passed on as an argument to the createIdKeyTuple method.
We will also define a type of a request (in this case it is a GET request) and specify that it will be returning a JSON document with @Produces annotation.
Now, that we are done with annotations for the method, let’s have a look at the code for this method, that defines a JSON end-point in the QRController class:
Note that in this code we have only simple exception handling that makes sure we return a correct HTTP status code – OK (200) on a success and server error (500) on an internal error. You can later add other HTTP codes based on your needs.
An End-Point Returning an Image
Returning an image instead of a JSON document is quite similar to the code we have already seen. Here we will have to pay attention to three aspects:
Different MIME type defined in @Produces annotation: @Produces("image/png")
Additional elements in the response header that let you control how the created file is displayed in the browser, i.e. shown in the browser “inline”, or made available through a download dialog – "Content-Disposition", "inline;" (see specs for Content-Disposition for more details)
Additional elements in the response header that let you control the name for the created file: filename=\"" + id + ".png\"
It is worth noting that the number of catch statements in the try...catch clause will vary and depend on the number and type of exceptions that can be thrown by the underlying methods.
An End-Point Returning a PDF
The last method for today – defining an end-point for returning PDF files – is nearly identical to the one we used for returning images, except for one thing:
Different MIME type and explicit file encoding in @Produces: @Produces("application/pdf; charset=utf-8").
Of course, there are also obvious differences in the contents of the byte[] array, but I consider that being outside the scope of this post – you can study those differences on your own.
What’s Next?
Here we have seen how easy it is to define an end-point that can return documents with various MIME types. In the next posts, we will be taking a closer look at things like how you can equip your end-points with metrics, provide auto-generated documentation based on OpenAPI, and add more resilience with fail-over and circuit-breakers.
]]>rustam.mehmandarovGenerating PDF Files Using Java2019-06-21T07:01:00+02:002019-06-21T07:01:00+02:00https://mehmandarov.com/generating-pdf-files-using-javaA step by step tutorial on how to generate PDF files in Java.
In my previous post, I have started describing a system for “checking-in” to a location using QR codes in Java. Now, I would like to describe another part of that system that will show you how to get started with generating PDF files using Java.
So, let’s have a look at how this can be implemented in your solution – step by step.
Choosing a Library
Generating PDFs is normally something you would like to do using 3rd party libraries, and there are quite a few alternatives available. While choosing a library it might be a good idea to have a closer look at the licensing for that library – some of them might be very permissive and some might force your code to comply to a specific licensing. Some libraries even come with dual licensing, one under a proprietary model and one supporting an open source model.
One should also consider other aspects like maturity and whether it is a high- or low-level library. The latter will tell you how much code you will actually end up writing to implement your features. In the course of this project, I ended up trying two different libraries – iText and, later, Apache PDFBox. Since the point of this code was a tutorial, I decided to stick with PDFBox as it is distributed under more permissive license – Apache License 2.0, as opposed to dual licensed iText that is under AGPL and a commercial license.
Generating PDF Files
As mentioned earlier, this library provides quite extensive functionality for generating PDF files, but it is also quite low-level, so you will have to be prepared to implement a few things you might usually take for granted, e.g. things like calculating coordinates for text that has to be centered on a page and a few other things. However, the library has a great community, so it is quite easy to get help.
Adding Maven Dependency
Ok, let’s get started. First things first, you will need to add the following dependencies to your pom.xml to use PDFBox (assuming you are using Maven to build your project):
For this post, I decided to paste the source code for the whole function doing the PDF generation and separate it with a few sentences, explaining the most interesting parts of the code. You can always piece the code together, or just have a look at the code in my repo. (Bonus: If you are interested in how much work it was to port the code from iText to PDFBox, this commit should give you a rough idea.)
We start with defining a document object, a page object and add a page to a document. Afterwards, we create a content stream object that will be added to the page and document objects. This object will be responsible for holding the text and images we will be generating here.
// Assume that the following variables are declared and set:// QRCodeSupplier qrCodeSupplier - to generate QR codes, shown in the previous post// String id - a string that will be shown on the top of the PDF file and used in the QR code// String timeZone - a string containing current time zoneStringheaderTitle=id;PDFontheaderFont=PDType1Font.COURIER_BOLD;intmarginTop=30;intfontSize=30;PDDocumentdocument=newPDDocument();PDPagepage=newPDPage(PDRectangle.A4);PDRectanglemediaBox=page.getMediaBox();document.addPage(page);PDPageContentStreamcontentStream=newPDPageContentStream(document,page,PDPageContentStream.AppendMode.APPEND,true);
Adding Text
Now we will need to calculate the coordinates for the header text string and make sure it will appear centered independent of the font and size. This is one of the “low-level” parts you will have to deal with when using PDFBox.
// calculate coordinates to center the header textfloattitleWidth=headerFont.getStringWidth(headerTitle)/1000*fontSize;floattitleHeight=headerFont.getFontDescriptor().getFontBoundingBox().getHeight()/1000*fontSize;floattitleStartX=(mediaBox.getWidth()-titleWidth)/2;floattitleStartY=mediaBox.getHeight()-marginTop-titleHeight;
Next, we will be adding the text itself and setting font and coordinates for it on the page:
// add header text to the document// Note: This solution will not support fixed-width paragraphs and text flowcontentStream.beginText();contentStream.setFont(headerFont,fontSize);contentStream.newLineAtOffset(titleStartX,titleStartY);contentStream.showText(headerTitle);contentStream.endText();
Adding Images
Now, let’s examine how to add an image to a PDF document. Here, you can use createFromFile() in case your image is already available, or createFromImage() is you are generating the image on the fly and/or returning it from another function.
Below, you will also find examples of code to scale and to calculate coordinates for centering the image:
// get image as a byte arrayByteArrayInputStreambais=newByteArrayInputStream(qrCodeSupplier.qrCodeGenerator(id));BufferedImagebim=ImageIO.read(bais);// convert image to an object that can be added to the PDF documentPDImageXObjectpdImage=LosslessFactory.createFromImage(document,bim);// calculate coordinates to center the imagefloatscale=1f;intimageOffset=100;floatimageWidth=pdImage.getWidth()*scale;floatimageHeight=pdImage.getHeight()*scale;floatimageStartX=(mediaBox.getWidth()-imageWidth)/2;floatimageStartY=titleStartY-imageHeight-imageOffset;// add image into the documentcontentStream.drawImage(pdImage,imageStartX,imageStartY,pdImage.getWidth()*scale,pdImage.getHeight()*scale);// closing the streamcontentStream.close();
// add metadatadocument.getDocumentInformation().setTitle("Generated QR code for "+id+".");document.getDocumentInformation().setSubject("with a secure string");document.getDocumentInformation().setAuthor("rm");document.getDocumentInformation().setCreator("rm");document.getDocumentInformation().setCreationDate(date);
Closing, Saving and Returning the Document
After your document is built and you have added all the contents, remember to save and close your document. Now you can either save the document to the file with document.save(), or returning the document as a byte array to another function with byteArrayOutputStream.toByteArray():
// save and close documentByteArrayOutputStreambyteArrayOutputStream=newByteArrayOutputStream();document.save(byteArrayOutputStream);document.close();// return document as byte[]returnbyteArrayOutputStream.toByteArray();
What Now?
In the last two posts, we have seen how to generate QR codes with a hashed string and PDF files with Java. In the next post, I will be showing how to put it all together into a MicroProfile microservice.
]]>rustam.mehmandarovGenerating QR Codes With Secure Hashes Using Java2019-06-10T07:01:00+02:002019-06-10T07:01:00+02:00https://mehmandarov.com/generating-qr-codes-with-secure-hashes-using-javaA step by step tutorial on how to generate QR codes and secure hashed strings with salt in Java.
I have been testing out new functionality for “checking-in” to a location using QR codes. To make sure the user is at the specified location and is scanning my QR code (and not a “fake” code created by someone else), I needed to add a way of “signing” each code with a value that only I – the provider of the QR code – could know. This would also make it simple enough to be able to implement the same mechanism in the app used to scan the codes to verify the validity on the client side.
I ended up with a solution where I would have a QR code containing a JSON object with a Name and a Key – a hashed and salted name string. The string will be read by the client app used to scan the code and hashed using the same algorithm with the same secret salt value, and compared to the value in the QR code on the client side.
The data structure inside a generated QR code would be like this:
When it comes to the implementation, I decided to do the generation or codes in Java and, later, implement this as a standalone microservice. Here, I must admit that I was surprised by how simple it was using a specialized library. More about that below.
So, let’s have a look at how this can be implemented in your solution – step by step.
Generating QR Codes
First, I needed a library that can handle QR codes, and I decided to use Zebra Crossing (“ZXing”) library because of its simplicity and popularity (i.e. community around it).
All you need to get started is to add the following dependencies to your pom.xml (assuming you are using Maven to build your project):
This library provides quite an extensive functionality both for generating and reading codes. This was more than enough for my use case where I just needed to generate a QR code with a simple JSON object:
publicbyte[]qrCodeGenerator(Stringid)throwsIOException,WriterException,InvalidKeySpecException,NoSuchAlgorithmException{StringfilePath="QRCode.png";Stringcharset="UTF-8";MaphintMap=newHashMap();hintMap.put(EncodeHintType.ERROR_CORRECTION,ErrorCorrectionLevel.L);Map<String,String>qrCodeDataMap=Map.of("Name",id,"Key",keyProvider.generateVerificationKey(id)// see next section for ´generateVerificationKey´ method);StringjsonString=newJSONObject(qrCodeDataMap).toString();createQRCode(jsonString,filePath,charset,hintMap,500,500);BufferedImageimage=ImageIO.read(newFile(filePath));ByteArrayOutputStreambaos=newByteArrayOutputStream();ImageIO.write(image,"png",baos);byte[]imageData=baos.toByteArray();returnimageData;}privatevoidcreateQRCode(StringqrCodeData,StringfilePath,Stringcharset,MaphintMap,intqrCodeHeight,intqrCodeWidth)throwsWriterException,IOException{BitMatrixmatrix=newMultiFormatWriter().encode(newString(qrCodeData.getBytes(charset),charset),BarcodeFormat.QR_CODE,qrCodeWidth,qrCodeHeight,hintMap);MatrixToImageWriter.writeToPath(matrix,filePath.substring(filePath.lastIndexOf('.')+1),FileSystems.getDefault().getPath(filePath));}
Note also fun little thing – the conversion of Java hashmaps to a JSON object using JSONObject. Sometimes it is much easier to build up data structure the way you want it, and then serialize to JSON:
If you are looking for a more simplified interface, you might also check out QRGen that claims to simplify QR code generation API for Java even further and is built on top ZXing. However, ZXing was absolutely fine in my case.
Hashing Strings
Now, I needed to be able to hash a string in a quick and secure manner. For this, I decided to use the method suggested by OWASP for Java. To implement this method you will need to start with updating your pom.xml:
By now you should be able to generate QR codes with a hashed string. In the next post, I will be sharing code on how to embed and generate PDF files with this information with Java, followed by a post where it all will be put together into a MicroProfile microservice. Stay tuned!
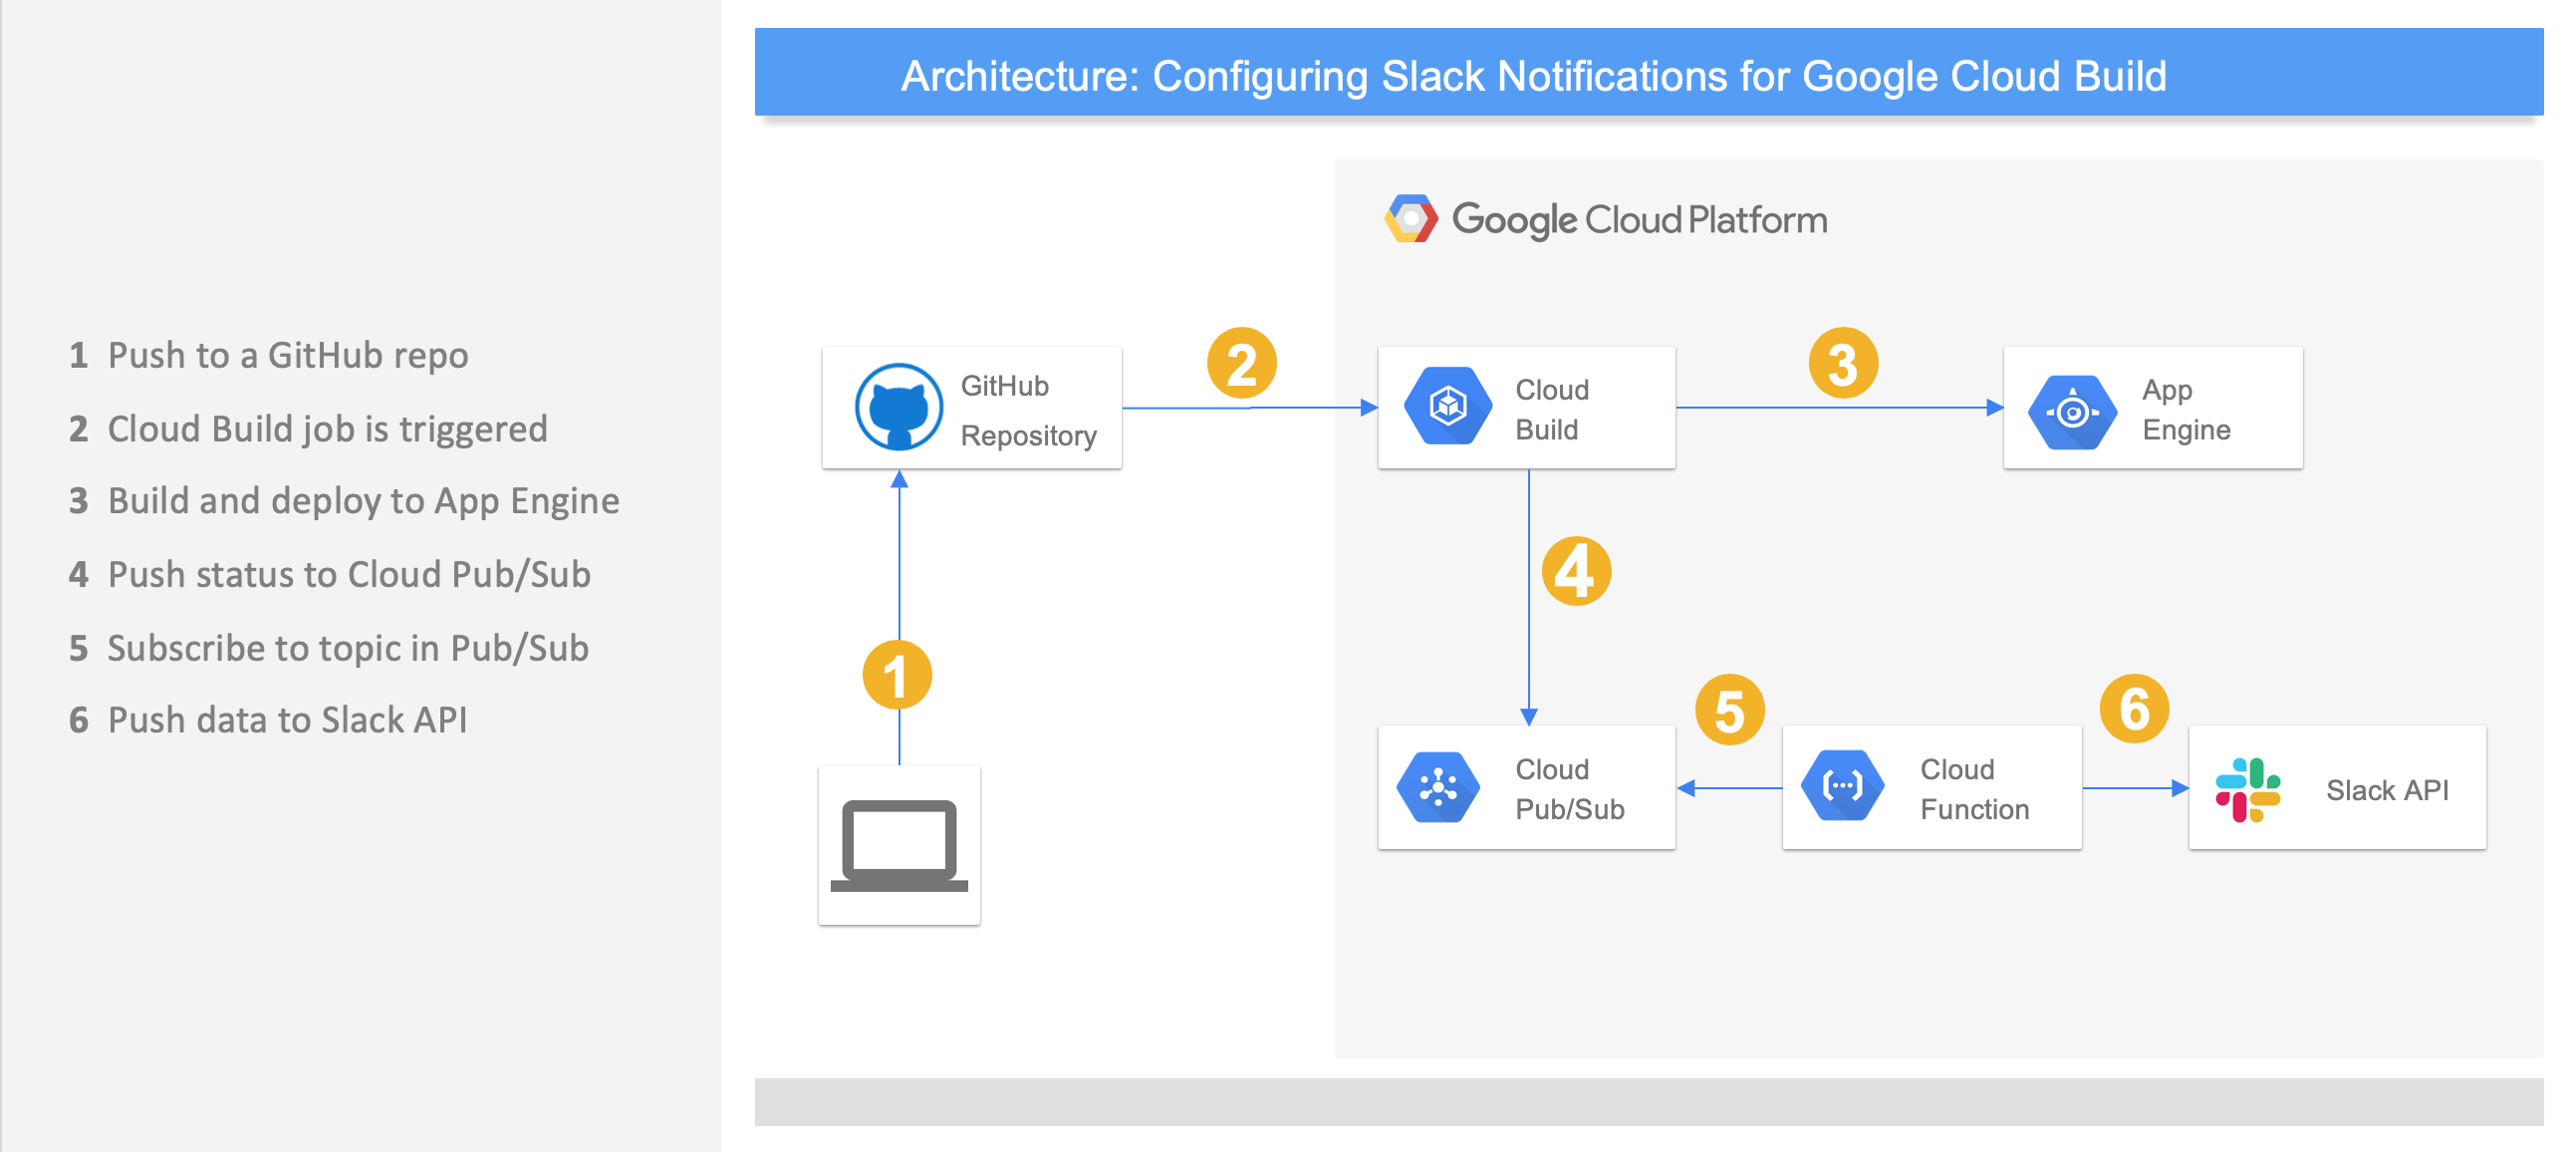
]]>rustam.mehmandarovConfiguring Slack Notifications for Google Cloud Build2019-03-01T07:01:00+01:002019-03-01T07:01:00+01:00https://mehmandarov.com/slack-notifications-for-cloud-buildAdding Slack notifications for your Google Cloud Build jobs explained with code examples and screenshots.
Recently we decided to migrate our builds from Travis CI to Google Cloud Build to speed up the builds. The process was quite easy and flawless; however, we were still missing a few minor things. One of them was the notifications from Cloud Build to our #ops channel in Slack. This was slightly annoying because you would not know if the build was finished and the site was deployed, or if it failed for some reason.
Integrating with Cloud Build was a bit more different than what you are used to from integrations with Jenkins or Travis CI. Normally you would just create a webhook that would call an interface in the Slack API. In Cloud Build, on the other hand, everything is getting posted to the Pub/Sub queue built into the platform, and here you would just need to subscribe to the specific queue and listen for the events. To achieve the latter, you would need a small serverless function to listen for these events and to call the Slack API.
The Architecture.
Note that here we will, technically, be using paid services on Google Cloud Platform, as both Cloud Build, Cloud Pub/Sub, and Cloud Functions are billable components. However, since all the components above provide a generous free tier, you will need to work hard to get passed the free tier with this setup.
Cloud Build: Free first 120 builds-minutes per day for Basic machine type (n1-standard-1).
Cloud Pub/Sub: Free first 10GB per month (pricing).
Cloud Functions: Free first 2 million invocations per month (pricing).
1. Before you begin
1.1 Prepare your GCP project
I assume you have a Google Cloud Account, and that you have signed in to your account.
Select or create a Google Cloud Platform project, e.g. from the Manage resources page.
Make sure that billing is enabled for your Google Cloud Platform project.
Enable the Cloud Functions and Cloud Pub/Sub. You can also enable the APIs using this link.
Choose the app’s name and your Slack team. Click Create.
Click Incoming Webhooks.
Activate incoming webhooks.
Click Add New Webhook to Workspace. An authorization page opens.
From the drop-down menu, select the channel to which you would like notifications sent.
Click Authorize.
A webhook for your Slack application has been created. Copy the webhook URL and save it for later use.
2. Create a Cloud Function
We need to create a Cloud Storage bucket to stage your Cloud Functions files. Use [STAGING_BUCKET_NAME] that is a globally-unique bucket name (such as [PROJECT-ID]_cloudbuilds):
Next, create a directory on your local system for the application code:
mkdir ~/gcb_slack
cd ~/gcb_slack
Then, create the following two files in the gcb_slack directory.
File 1:package.json
{"name":"google-container-slack","version":"0.0.1","description":"Slack integration for Google Cloud Build, using Google Cloud Functions","main":"index.js","dependencies":{"@slack/client":"4.10.0"}}
File 2:index.js
Note: Make sure to update SLACK_WEBHOOK_URL in the code below.
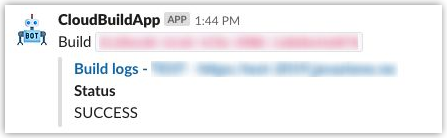
constIncomingWebhook=require('@slack/client').IncomingWebhook;constSLACK_WEBHOOK_URL="<INSERT YOUR WEBHOOK FROM STEP 1.2>"constwebhook=newIncomingWebhook(SLACK_WEBHOOK_URL);// subscribe is the main function called by Cloud Functions.module.exports.subscribe=(event,callback)=>{constbuild=eventToBuild(event.data.data);// Skip if the current status is not in the status list.// Add additional statues to list if you'd like:// QUEUED, WORKING, SUCCESS, FAILURE,// INTERNAL_ERROR, TIMEOUT, CANCELLEDconststatus=['SUCCESS','FAILURE','INTERNAL_ERROR','TIMEOUT'];if(status.indexOf(build.status)===-1){returncallback();}// Send message to Slack.constmessage=createSlackMessage(build);webhook.send(message,callback);};// eventToBuild transforms pubsub event message to a build object.consteventToBuild=(data)=>{returnJSON.parse(newBuffer(data,'base64').toString());}// createSlackMessage create a message from a build object.constcreateSlackMessage=(build)=>{letmessage={text:`Build \`${build.id}\``,mrkdwn:true,attachments:[{title:'Build logs - Your Custom Message Goes Here',title_link:build.logUrl,fields:[{title:'Status',value:build.status}]}]};returnmessage}
3. Deploy the Cloud Function
To deploy the subscribe function with a Cloud Pub/Sub trigger, run the following command in the gcb_slack directory:
